FPV live video using radio frequency antenna, transmitter and receiver signaling technology is one of the main reasons why drones have become so popular.
This live video transmission, along with high quality cameras, allow drones to be used in many positive ways across numerous sectors. It is a terrific flying experience as you are seeing what the drone camera sees. If you are using top FPV goggles, it feels as if you are in the drone.
To fly a drone, you don’t need to understand the technology behind it all, as drones have become so easy to fly. However, understanding the UAV’s live video transmission technology will help you if you want to increase the live video range from your drone or troubleshoot video transmitter and receiver problems.
If you want to build and design drones, then understanding drone live video using radio frequencies, transmitters and receiver signalling technology is essential.
This post will assist you in learning about live video transmission, radio frequencies, omnidirectional and directional antennas and how to increase the FPV range from any drone. We’ve add some terrific antenna technology videos here.
Drone Antenna FPV Live Video
What Are UAV Radio Signals Answered
Radio frequencies always need an antenna to transmit and receive radio signals. Drone FPV (First Person View) signals or live video transmitter signals are no different.
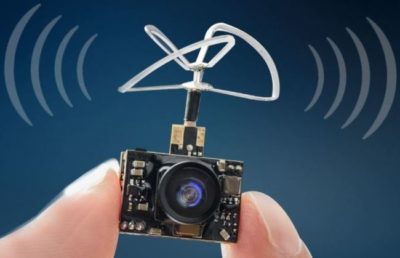
If you have an FPV transmitter like in the above photo which is a 200 milliwatt, 5.8 GHz, 40 channel video transmitter, it produces an omnidirectional radiation pattern from it’s circularly polarized antenna.
Omnidirectional Radiation Patterns
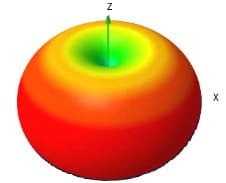
In radio communication, an omnidirectional antenna is a class of antenna which radiates radio wave power uniformly in all directions in one plane, with the radiated power decreasing with elevation angle above or below the plane, dropping to zero on the antenna’s axis. This radiation pattern is often described as sphere or doughnut shaped.
 If you can picture the above video transmitter with antenna in the middle of a balloon, then the radiation which comes out of the antenna spreads out in all directions.
The radiation pattern is pretty much a circle or omnidirectional which is an equal amount of strength in all directions.
Now, if you have a corresponding circularly polarized omnidirectional receiver antenna, then you can receive FPV video signal more or less equally in any direction from the FPV transmitter.
How far away, you receive video signal depends on the transmitter and receiver your are using. The video quality will become grainy or you will lose video as the receiver and transmitter move away from each other. Using the above omnidirectional transmitter and corresponding antenna will give a live video signal up to about 1.5 mile (2.4 km) range.
Now, supposing you want to receive live video transmission further than 1.5 mile (2.4 km). For example you want to receive live FPV video transmission from your UAV from 3 miles (4.8 km).
You could decide to use a more powerful FPV transmitter and receiver. However, to double the range, you would need to quadruple the power. So if a 200 milliwatt transmitter gives a 1.5 mile video transmission range, then you would need an 800 milliwatt transmitter to double the live video range. The more powerful the video transmitter, the more drain on your battery.
Also, depending on where you are living, a more powerful transmitter may have an effect on other devices nearby as well as receiving interference from other devices, which may both the video signal from your drone or to the drones GPS navigational system.
So you really need to keep the transmitted power as low as possible.
Drone FPV Live Video Gain
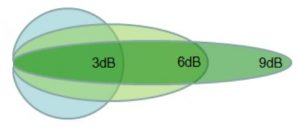
Another way to extend the drone’s live video range is to have an antenna on the receiver which allows for some gain. Gain is like having more power and the mathematics behind gain is always the same. Every time you double the power of the transmitter, you will get an extra 3 decibels of antenna gain.
If you quadruple the power you will get twice the video range. So 4 times the power, will be equal to 6 six decibels of gain. That requires 2 lots of 3 decibels for 6 decibels of antenna gain.
So, if we use a 6 decibel receiver antenna with gain, it is the same as running an 800 milliwatt transmitter to go from 1.5 miles to 3 miles video transmitter distance.
You will be able to go 3 miles without changing anything on the transmitter. All that is required is an antenna on the receiver which has 6 decibels of gain.
What Is Antenna Gain Answered
Antenna Gain is a relative measure of an antenna’s ability to direct or concentrate radio frequency energy in a particular direction or pattern. The measurement is typically measured in dBi (Decibels relative to an isotropic radiator) or in dBd (Decibels relative to a dipole radiator).
So with the omnidirectional antenna the radio frequency (RF) range was doughnut or sphere shaped.
With the gain antenna, the RF is more concentrated in a particular direction. We don’t have the doughnut or sphere shape anymore. Because of the nature of the antenna, it concentrates the radio frequency out a lot further in one particular direction. Gain antenna are also known as directional antenna.
So the 6 decibels required to give double the live video range on the drone is gained by concentrating the radio frequency in a narrower and more concentrated direction. That is how we get gain.
 Because the antenna gain is only in one direction, which is also narrower than omnidirectional, then if we fly our drone behind this antenna or outside the narrow radio frequency, then we start to lose the live video.
Even if the drone is close enough to the pilot on the ground but if the transmitter is outside the directional antenna range, then the live video is not going to be received.
The range behind and outside the directional gain antenna is much reduced because all that directional radio frequency is at the front.
Using Omnidirectional and Directional Gain Antenna Together
The ideal way to receive live video is to use both the directional antenna to get the maximum video in one direction. In our above example, this would be 3 miles of video transmission. Then using a diversity controller along with an omnidirectional antenna, you will receive the 1.5 mile range when you move outside and behind the directional antenna.
What this really means, is that when you are flying, there will be areas where the omnidirectional antenna is going to have the stronger signal and other areas where the directional antenna will have the stronger signal. A diversity controller will switch between the directional antenna and the omnidirectional antenna.
Diversity Controllers
A diversity controller is used to bridge at least two wireless video receivers together. You can buy diversity controllers with plenty of channels very easily. Many drone enthusiasts build their own 2, 4 and 6 channel diversity boards.
A Diversity Board needs to be able to receive 2 different channels at the same time and to be able to automatically switch to the best antenna. An example of a Diversity Board, also known as a Diversity Receiver is the JIMI D58-2.
Here is an excellent video which explains first person view live video transmission, diversity controllers and antenna receivers.
Multiple Gain Antenna For Wider And Longer Live Video
Now, when you are flying with directional antenna for a longer live video transmission, it is a long but quite a narrow flying range. So how do you get to expand outwards of the narrow radiation pattern to be picked up by the receiver.
You could use a UAV directional antenna tracking system. These systems swivel and track as your drone flies. The can be quite expensive and some have astonishing range. The high end Mobile UAV Tracking Antenna has a range of 62 miles (100 km). Another is the Veronte antenna tracker.
These antenna tracking systems are all pretty expensive. So what you can do to get a wider range is to use 2 or more directional antennas along with a multiple channel diversity receiver controller board.
The directional radio frequency patterns should overlap and then you’ll get a spread so that you can then fly your drone in a wider area than with just one directional antenna.
You now have a much wider area to fly in and receive the live video. As the drone flies from one area to another, the diversity controller will automatically switch antennas to pick the one that has the strongest signal.
Drones With Long Range Live Video Transmission
A few years ago, there wasn’t a lot UAVs on the market, which could transmit live video any decent sort of distance. However today, drones from DJI such as the Mavic Pro, Inspire 2 and Phantom 4 can transmit live video from a distance of 4.3 miles (7 km).
The DJI Mavic 2 Pro and Mavic 2 Zoom have pushed the max video transmission distance even further to 5 mile (8 km).
Only recently DJI released the Mavic Mini and Mavic Air 2 drones.
The Mavic Mini weights only 250 grams has a max video transmission distance is 2.48 mile (4 km), which is pretty incredible for such as small drone.
The Yuneec Typhoon H has a transmission distance of 1 mile (1.6 km) and the Walkera Voyager 4 has a video transmission of 0.6 miles (1 km).
Their really is a huge list of UAVs on the market which have exceptional video transmission range.
Latest Live Video Transmission Technology
DJI OcuSync
The DJI Mavic Pro drone uses a newly developed video transmission system called OcuSync. It is part of DJI’s Lightbridge video transmission family and OcuSync performs far better than other WiFi and RF analog transmission systems.
OcuSync uses more effective digital compression and channel transmission technologies, allowing it to transmit high definition video reliably even in environments with strong electromagnetic interference.
Compared to traditional analog transmission, OcuSync can transmit video at 720p and 1080p which is anywhere from 4 to 10 times better quality, without any color cast, static interference, flickering or other problems associated with analog transmission. Even when using the same amount of radio transmission power, OcuSync transmits further than analog at 4.3 miles (7 km).
There is another benefit to this newly developed OcuSync video transmission technology. Ordinary analog video transmission systems are generally not integrated into the whole system of the UAV, so there can be issues with latency in the video being received.
OcuSync is able to strike a perfect balance between latency and receptivity, reducing latency to 5 milliseconds for remote controller transmission commands, 10 milliseconds for video data and 130 milliseconds for video.
DJI OcuSync 2.0
The Mavic 2 Pro and Mavic 2 Zoom max video transmission distance is 5 mile (8 km). Now, to reach this, the drone must be flying unobstructed and in line of sight using the Remote Controller with the DJI Go 4 app connected. The area should be clear of electromagnetic interference, which will disrupt the video transmission.
The Mavic 2 Pro and Zoom feature the DJI OcuSync 2.0 technology. This OcuSync 2.0 technology supports both 2.4 GHz and 5.8 GHz frequency bands, featuring stronger interference resistance and automatic switching capabilities to deliver the 5 mile (8 km) 1080p video transmission feeds.
The new Mavic Air 2 also uses OcuSync 2.0 technology, which gives it an impressive max video transmission distance is 6.2 mile (10 km).
DJI FPV Goggles
DJI now have 3 FPV goggles on the market. These have low latency and produce high definition video feed back to their goggles. They have the original DJI Goggle, a Racing Edition and also a Digital FPV system to be used on non DJI drones such as DIY kits, racing drones and robots. You can read further on the latest DJI Goggles here.
FPV Antenna Gain And Range Video
Now to finish off this post, here is a terrific video which explains all about live FPV antenna gain and range.

