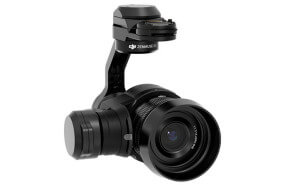
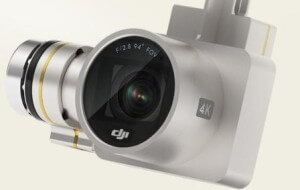
With drone aerial photography, it is important to use a top quality camera, so you get the best photos every time. You also need a drone camera which has plenty of settings.
The better your understanding is of these camera settings, then your aerial photography and filming will come on in leaps and bounds.
Understanding camera settings such as ISO, shutter speed, aperture, focus and metering, along with the best gimbal stabilization, are all important factors to obtaining crisp sharp professional aerial photos.
In this article, we explain in simple language, what each camera setting is and the best recommended settings for aerial photography. The below camera knowledge is great to have, for both aerial and land based photography. Throughout this article, you will find some terrific aerial photography videos as well.
It is a great idea, to practice with the various camera settings on your drone and build your knowledge. Also, you can read another couple of excellent articles for expanding your knowledge. Articles include, How To Aerial Film People and Aerial Lens Filters For Landscape Photography.
Using the right camera and settings, which are proven for aerial photography will allow you to avoid distorted photos such as chromatic aberration and barrel distortion. To become an expert at anything takes time and practice. Drones are great fun so you will certainly enjoy the learning curve.
Drone Aerial Photography Camera Settings
Optical Zoom
Practically all digital cameras today are fitted with a zoom lens. The zoom lens allows you to control how much of the subject is included in your picture without having to alter your distance to or from the subject.
The zoom range of a digital camera is given in terms of its 35 mm equivalent. This is because most users are familiar with the 35 mm film lens. Using the zoom is ideal, when the original scene looks clustered or has loads of distractions.
Shutter Speed
This is perhaps the single most important camera setting for great aerial photography.
The camera’s shutter controls the amount of time light is allowed to reach the CCD (in simple terms, the CCD is where the digital image pixels are created). Shutter speeds are shown as multiples of one second. The shutter speed setting is a very creative setting for controlling the movement in a picture.
With aerial photography, depth of field isn’t an issue, so set your camera on shutter priority. Select between 1/500th to 1/1000th of a second (1/750th of a second freezes most blur with lenses up to 100 mm in length on a full-frame camera).
Faster shutter speeds (1/500) tend to freeze subject movement while slower speeds (1/30) allow subject movement to be recorded as a blur in the picture.
Here is a video with some terrific aerial photography tips. In this videos from Zapography, they are using the DJI Phantom 3 drone which has a 4k camera and has drone technology such as waypoints, follow me mode and points of interest.
Focus Methods
Digital cameras are all linked to an automatic focusing (AF) system. There are differences from manufacturer to manufacturer. The two basic AF modes are Single and Continuous, often also referred to as One-shot and Servo.
Most modern cameras have quick and effective auto-focus capabilities. Continuous AF mode is better for aerial photography and moving targets, such as kids playing because focus continually tracks subjects.
On the ground or while hovering the single AF mode will work very well because auto-focus locks onto its target when you apply a light press to the shutter release button and remains fixed while you maintain the light press, until fully pressing the button to take your shot.
White Balance
White balance is how your camera interprets the color of light in a scene through its lens. Different white balance settings will give your photos various colors from natural to tints of blue, yellow, orange and brown color. You can work with automatic settings in the beginning.
However, getting to know how to correctly set your camera’s white balance settings manually or using various custom settings such as cloudy, shady, tungsten and kelvin etc will improve your photos immensely. You can read this full article to understand white balance.
Stabilization / Vibration
 If you purchase a drone from the top manufacturer you are practically guaranteed to get an excellent quality gimbal for image stabilization. Some of the best are DJI, Autel, Walkera and Yuneec.
The gimbal keeps the drone stable by accessing and making adjustments hundreds of time per second to keep the drone stable and perfect for aerial filming and photography. Dampers reduce vibration.
DJI – Top Drones With Cameras
At present DJI are world leaders in aerial gimbal technology.
Their latest quadcopters produce stunning aerial cinematography. DJI latest drones are the Mavic Air 2, released in April 2020 and the Mavic 2 Pro and Mavic 2 Zoom.
Then you have the slightly older DJI quadcopters, which all have excellent cameras. These are the Mavic Air, Mavic Pro, Inspire 2, Inspire 1 and Phantom 4 Pro. These all come with top quality 4k cameras.
The Inspire 1 Pro with Zenumse X5R gimbal and camera is the world’s first Micro Four Thirds aerial camera capable of recording lossless 4k videos in RAW.
The Inspire 2 is the drone of choice for professional aerial photographers and film makers. The Inspire 2 image processing system CineCore 2.1, records video at up to 6k in CinemaDNG/RAW and 5.2k in Apple ProRes when used with the Zenmuse X7 camera.
The Inspire 2 with Zenmuse X5S or X7 camera creates Hollywood quality film. In fact, the Inspire 2 filmed all aerial and ground shots in the short film called The Circle. Watching this short film gives you an idea of the superb quality of the Inspire 2.
You can only find the Inspire 2 direct from DJI now and you can choose from the various cameras.
Drones with 4k or higher cameras are becoming more regular. You can read further on these latest 4k camera drones.
ISO For Aerial Photos
The ISO setting allow you to capture subjects in a wider range of lighting conditions. For example, changing to a higher ISO value will allow you to continue taking photos as the light gets darker without using the cameras built-in flash.
Aerial photography is all about resolution so the lower the ISO the better. Using the lowest ISO setting available with your equipment helps to ensure the maximum resolution of your image. Also, it is best not to use digital ISO settings below the lowest rated offered by your camera.
Here are some other guidelines for ISO settings;
Low ISO Setting (100-200)
- Outdoor subjects in sunlight.
- Landscape or indoor static subjects using a tripod.
- Use when maximum image quality is required.
Medium ISO Setting (250-400)
- Dull weather scenes.
- Capturing movements in good lighting conditions.
- Hand-held candid shots.
High ISO Settings (500-800)
- Low light scenes.
- Pop concerts and Night photography.
- Capturing fast movement in dull or indoor conditions.
Basically, ISO controls the sensitivity of your camera’s sensor to light. When you understand ISO, then both your aerial and ground based photos improve dramatically. You will know exactly what to do in different lighting conditions. One of the best articles to learn and understand ISO is entitled “ISO Explained For Beginner Photographers“.
This is a terrific article for beginners and even seasoned professionals to photography will learn a lot from it. The article also has some excellent videos.
Aperture
 Aperture is one of the three pillars of photography. The other two being ISO and Shutter Speed. Without a doubt, it is the most talked about subject, because aperture either adds a dimension to a photograph by blurring the background, or magically bringing everything into focus.
An adjustable iris built into the lens of a camera controls the aperture. This iris can be opened and closed to control the amount of light reaching the CCD.
The size of the hole of the iris is denoted by f- numbers and written in fractions. Examples are f/11, f/5.6 and f/2.8. The higher the f- number the smaller is the hole in the iris.
Now as the iris is closed down and made smaller, less light reaches the CCD. The combination of shutter speed and aperture is used to control the total quantity of light allowed to affect the CCD and hence form the image of the subject.
The aperture affects how much of the scene will be acceptably sharp. A large f-number such as f/32, (which means a smaller aperture) will bring all foreground and background objects in focus.
If you want to make a subject stand out from a cluttered background, you would use a smaller f-number (higher aperture) such as f/1.4 or 2.8. The area of sharpness is also known as depth of field.
Every lens has a limit on how large or how small the aperture can get. If you take a look at the specifications of your lens, it should say what the maximum (lowest f-number) and minimum apertures (highest f-number) of your lens are. The maximum aperture of the lens is much more important than the minimum, because it shows the speed of the lens.
A lens that has an aperture of f/1.2 or f/1.4 as the maximum aperture is considered to be a fast lens, because it can pass through more light than, for example, a lens with a maximum aperture of f/4.0. That’s why lenses with large apertures are better suited for low light photography.
The minimum aperture is not that important, because almost all modern lenses can provide at least f/16 as the minimum aperture, which is typically more than enough for everyday photography needs.
Aperture In Aerial Photography
We know aperture affects depth of field. Unlike ground-based photography, depth of field is almost a non-issue in aerial photography, since we are focusing almost to infinity. Set your aperture at the maximum sharpness setting for the lens. Concentrate on shutter speed and framing your subject.
Get to know the f-stop (aperture) which provides the maximum sharpness for your particular lens. As a rule of thumb for most lenses, maximum sharpness is generally two stops down from the maximum (widest) setting. For example, an f/2.8 lens will normally realize maximum sharpness at around f/8.
Metering For Aerial Photography
Metering is how your camera determines what the correct shutter speed and aperture should be, depending on the amount of light that goes into the camera and the sensitivity of the sensor.
Today, every DSLR has an integrated light meter that automatically measures the reflected light and determines the optimal exposure. The most common metering modes in digital cameras today are:
- Matrix Metering also known as Evaluative Metering.
- Center-weighted Metering.
- Spot Metering.
In aerial photography use Matrix full-frame metering rather than “spot” metering mode to reduce exposure issues.
Aerial Photography Camera Tips – Videos
To finish this article here are some more terrific aerial photography tips in the below video. With this knowledge and having one of the latest top drones, you will no doubt film and photograph professionally every time.
After viewing the below videos, here is another terrific article with 15 drone photography tips. These cover lens filters, filming in RAW format, the thirds grid, UAV forecast, auto exposure bracketing, counterpoints, juxtaposition, lighting, leading lines, creating depth in photos and much more.

